Posted in Search and Ranking

Introduction to Semantic Search

Semantic search is a type of search that takes into account the meaning and context of a query from a user as opposed to lexical search which only looks for exact keyword match of the query terms.

As an example, when a user searches for the term “football”, we want the search to also consider words such as “soccer”. When “football” is misspelled as “ftball”, we still want to match with “football”.

Semantic search has the ability to dramatically improve the user experience by improving the quality of search results. This is achieved by various Machine Learning models and AI technologies.

Structured Vs Unstructured Data

Structured data is well-defined and is easily searchable whereas unstructured data can be anything such as photos, audio, videos, paragraphs of texts, emails etc and is harder to search through.

Structured data fits well into a storage solution such as a relational database and is searchable using SQL queries but unstructured data does not and needs to be processed using machine learning algorithms to get relevant search results.

As much as 80% of data out there is unstructured. This is important for semantic search because it works on unstructured data which needs to be indexed in a way that it is searchable as efficiently as possible.

Transforming Unstructured Data Using Vector Embeddings

In order for Machine Learning algorithms to process unstructured data to get the most relevant results, this data needs to be represented in a way that the ML models can understand.

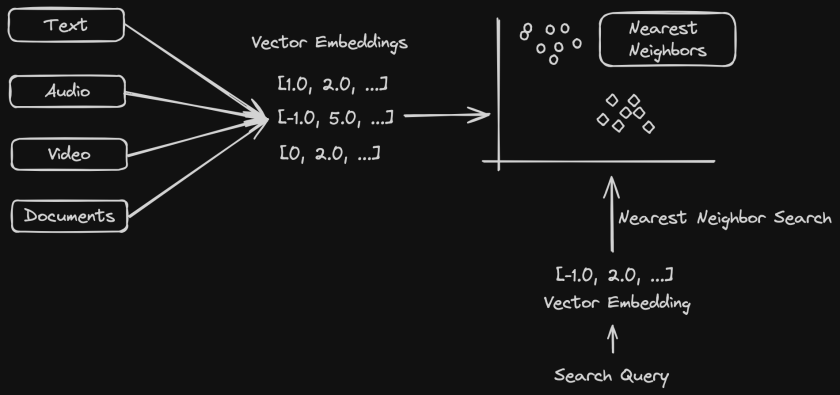
This is where Vector Embeddings become useful. Vector Embeddings represent data in numerical form. This opens up a world of computational possibilities on this data. Vector Embeddings transform unstructured data into points in the vector space where similar points get clustered together. This means words, sentences, audio data etc can be represented as vectors which get clustered together in an n-dimension vector space according to their similarity. This is then used by machine learning algorithms to find patterns using which we can do queries that find the most relevant search results.

Vector Embeddings

Here is an example of a 5 dimensional vector embedding. Each point in the vector refers to a feature representing the data.

[1.0, 3.0, 5.0, 7.0, 9.0]

There are various types of embeddings such as word embeddings, graph embeddings, image embeddings etc. The most common type of embeddings used are word embeddings which is used to represent textual data and is used in Semantic Search.

Indexing Vector Data

When data is represented as vector embeddings, it can have high dimensionality based on the number of features used to represent the data. We therefore need a way to efficiently search through large sets of vector embeddings.

Indexing the vector data in the right way helps in efficiently retrieving the most relevant results during search. There are various indexing algorithms proposed for this but a couple of them are highly popular.

Locality Sensitive Hashing (LSH)

This technique is used to do an approximate nearest neighbor search in high dimension vector space. LSH is a hashing based algorithm that will hash similar points to the same or nearby buckets with a high probability so that the search space reduces. Collisions are maximized for similar inputs unlike traditional hashing where we minimize them. This makes it faster to find the approximate nearest neighbors.

Some parameters that need tuning to achieve a good trade off between accuracy and efficiency are hash size, number of hashing functions, number of hash tables etc.

Hierarchical Navigable Small Worlds (HNSW)

HNSW is a graph based data structure that can be used for approximate nearest neighbor search. This works great for high dimensionality vector data since it navigates the graph efficiently for similarity search.

The graph data structure is organized into levels with the bottom layer containing the most data points and each layer above it being a subset of the previous one. The vertices are created such that the likelihood of a graph node appearing in top layers decreases exponentially, which helps keep the graph sparse at higher levels enabling efficient search.

During a search operation, we start at the top most layer and navigate towards the bottom of the graph to find the nearest neighbors that decrease the distance to the input data points. This means we are searching more coarsely at the top instead of having to search the entire graph and keep refining the search as we get to the bottom layer.

HNSW graph

In the example above, we want to find the nearest neighbor of the red dot. So we start at the top most layer at an entry point node and traverse to the neighbor, we then go to the next levels to try and find the nearest neighbor. This is an oversimplification of HNSW works but we will look at this topic in detail on another post.

HNSW are efficient and have good accuracy, thereby being the most popular algorithm for vector similarity search at the moment. HNSW may not suit data that gets frequent updates since reconstructing the graph often is an expensive process.

Searching on Vector Data

Vector Search

Vector search also known as nearest neighbor search is what powers several semantic search use cases. This works efficiently on vector embeddings that we learnt about in the previous section. Since the search query is also represented as a vector, finding the most relevant results would mean searching for the nearest neighbors for the given query data.

The most popular algorithm for doing a nearest neighbor search in kNN – k nearest neighbor search. This provides highly accurate results but it is also computationally intensive. For large language model datasets, this does not scale well. So in these cases, the ANN – Approximate Nearest Neighbor search works much better at the cost of slightly reduced accuracy. We will learn about KNNs and ANNs in future posts on this topic.

Hope you enjoyed learning about semantic search. Let’s continue to explore this topic in more detail.

Posted in Software Engineering

HTML and CSS basics for Backend Engineers

HTML (Hyper Text Markup Language) and CSS (Cascading Style Sheets) are both important technologies used in Web Development but when I came into Backend Development I did not know much about these. I still haven’t had the need to work with them except for a newsletter that I was putting together every month for a year but that made me feel interested to learn more. This article will go over some of the basics that are useful to know as a Backend Developer with a lot of useful resources for further study.

HTML

A basic HTML document is a text file made up of elements and tags. The first page is named as index.html. There are various tags but the following make the overall outline of the document.

  • <!DOCTYPE html> as the first line of an html document so that browsers can render the page correctly.
  • <head></head> contains any machine readable information
  • <html></html> that contains all the document content
  • <body></body> which contains all the parts visible in a browser
<!DOCTYPE html>
<html>
<title>Title</title>
<head>
</head>
<body>
    <h1>This is the first heading</h1>
    <p>This is the first paragraph</p>
</body>
</html>

HTML Tags

Here are a few other important html tags.

TagDescription
<h1></h1> to <h6></h6>Heading tags
<p></p>Paragraph tag
<img src=”image.jpeg” alt=”Name of the image” width=”100″ height=”100″>Image tag
<a href=”www.wordpress.com”>Text for this link</a>HTML links
<table></table>Table
<th></th>Table header
<tr></tr>Table row
<td></td>Table data
<div></div>Container for HTML block level elements and styling
<span></span>Used to organize inline elements
<link>Link a CSS stylesheet

Here is a simple webpage using some of the above elements. Try it in your own browser as well!

<!DOCTYPE html>
<html>
<title>HTML AND CSS</title>
<head>
</head>
<body>
<h1>HTML and CSS basics</h1>
<p1>Differences between HTML and CSS</p1>
<br></br>
<table border="1">
    <tr>
        <th>HTML</th>
        <th>CSS</th>
    </tr>
    <tr>
        <td>Stands for Hyper Text Markup Language</td>
        <td>Stands for Cascading Style Sheets</td>
    </tr>
    <tr>
        <td>Used to build static web pages and applications</td>
        <td>Used to enhance the presentation of an HTML document</td>
    </tr>
</table>
<a href="thatgirlcoder.com">Learn more here!</a>
</body>
</html>

This is the web page as rendered by the browser.

You can find a list of all HTML elements here.

Block vs Inline Elements

InlineBlock
Does not start in a new lineAlways starts in a new line
Takes up as much width as needed onlyTakes up full width
Examples: <span>, <a>, <br>, <img> etc.Examples: <p>, <div>, <table>, <form>,

CSS

CSS stands for Cascading Style Sheets and a styles.css file can be defined to link to an HTML document to change its styling.

CSS can be applied to an HTML page either internally or externally. To use it internally, the <style> tag is used as follows.

<!DOCTYPE html>
<html>
<head>
    <title>Title</title>
    <style>
        body {
            background-color: #e1b382;
        }
    </style>
</head>
</html>

To apply an external stylesheet, the <link> tag is used as shown below.

<head>
    <link rel="stylesheet" type="text/css" href="<CSS_FILE_NAME">
</head>

Selectors

In CSS, different types of selectors are used to select various HTML elements to apply styling rules to. Some of the important type of selectors are as follows.

Element Selectors

This is used to select HTML elements based on type such as <p>, <h1> etc.

<h1>This is a heading</h2>
.h1{
    color: #xyz;
}

ID Selectors

This uses the ID attribute of an HTML element.

<div id="section"></div>
#section{
    color: #xyz;
}

Class Selectors

Selects using the class attribute of HTML elements.

<p class="paragraph">Start reading!</p>
.paragraph {
    color: #xyz;
}

Descendant Selectors

This is used to select HTML elements contained within another selector. In the below example, the color will be applied to all the <h1> elements that are descendants of the span ID element.

<span id="span">
    <h1>Heading 1</h1>
    <h1>Heading 2</h1>
</span>
#span h1{
    color: #xyz;
}

Child Selectors

This is more specific that descendant selectors. This will select the immediate descendants (ie., children) of a parent selector. In the below example, the color will be applied only to the immediate children of the “section” Id which are “Heading 1” and “Heading 2”

<div id="section">
    <h1>Heading 1</h1>
    <h1>Heading 2</h1>
    <div>
        <h1>This is a nested heading</h1>
    </div>
</div>
#section > h1 {
    color: #xyz;
}

CSS Box Model

The box model consists of the following properties to represent an HTML element as a box.

  • Content – text, images etc
  • Padding – area around the content
  • Border – non-transparent area around the content and padding
  • Margin – area around the border

I like to remember this as MBCP from outer most Margin to inner most Content.

div {
  width: 200px;
  border: 10px blue;
  padding: 20px;
  margin: 20px;
}

Now let’s design a super simple food menu as shown below. I have included the css code in the same file so that you can use it in any online code editor.

<!DOCTYPE html>
<html>
<head>
    <title>Veg Paradise</title>
    <style>
        body {
            background-color: #e1b382;
        }
        h1 {
            color: #12343b;
        }
        h2 {
            color: #c89666;
        }
        .center-text {
            margin-left: auto;
            margin-right: auto;
            text-align: center;
            padding-top: 12px;
            padding-bottom: 12px;
            background-color: #2d545e;
        }
        p {
            color: #12343b;
        }
        h2 > span {
            color: #FA9F42;
            font-size: 0.75em;
        }
        #copyright {
            font-size: 0.75em;
        }
    </style>
</head>
<body>
    <div class="center-text">
        <h1>Food Menu</h1>
        <h2>Moong dal cheela <span>New!</span></h2>
        <p>Yellow split lentils, ginger, green chillies.</p>
        <h2>Pesarattu</h2>
        <p>Whole green gram, ginger, green chillies, cumin seeds.</p>
        <h2>Idly</h2>
        <p>Fermented rice batter.</p>
        <h2>Idiyappam</h2>
        <p>Rice noodles, shredded coconut served with peanut curry.</p>
        <h2>Dosa</h2>
        <p>Fermented rice batter.</p>
        <h2>Millet upma</h2>
        <p>Pearl millet, mixed vegetables.</p>
        <h2>Vegetable poha</h2>
        <p>Flattened rice, chickpeas, mixed vegetables flavored with lemon juice.</p>
    </div>
    <div class="center-text">
        <p id="copyright">
            Copyright Veg Paradise
        </p>
    </div>
</body>
</html>

Hope you learned the basics of HTML and CSS to navigate web development as a Backend Engineer. I recommend the following resources when you are programming.

Resources

Posted in Data Structures/ Leetcode

Monotonic Stack

Today let us learn about monotonic stacks and their usage.

A monotonic stack is one in which the elements of the stack are always increasing or decreasing. This ensures that the stack is always sorted in some order. Some interesting applications of monotonic stacks are to

  • Find the next smaller or greater element in an array
  • Find the previous smaller or greater element in an array
  • Find the minimum or maximum element in a sliding window etc.

Let’s take a look at an example problem below.

Find the next greater element in an array

The next greater of an element X in an array is the first greater element to the right side of X. For example:

[1, 2, 3, 4]

  • Next greater element (1) => 2
  • Next greater element (2) => 3
  • Next greater element (3) => 4

In this problem, we can use a monotonic stack to push elements into and keep popping the elements as long as the top most element has a value smaller than the current element whose next greater element we want to find. That’s a mouthful, so let’s look at an example!

We have the following array.

Input: [1, 3, 4, 2, 5] and here’s an array of the next first greater elements to the right of each element in the array.

Output: [3, 4, 5, 5, -1] (-1 when no next greater element exists)

Algorithm:

  • Iterate the given array from i = 0 to i = N – 1.
  • Push the element array[i] in the monotonic stack if either the stack is empty or the top of stack > array[i]. We are thereby building a monotonic stack decreasing from the bottom to top.
  • In this process, we have to pop the elements in stack if they are lesser than array[i] which is the first greater element found to the right of the popped one.

Look at how the stack and the mapping changes as we iterate the array in the following diagram.

Finally push 5.

Time Complexity: O(N) where N is the size of the array that is iterated. This is because we iterate the array only once and each element is pushed and popped exactly once.

Space Complexity: O(N) since the mapping and the stack will contain at most N elements.

Code:

In the following code nums1 contains the elements whose next greater element should be found in nums2.

class Solution:
    def nextGreaterElement(self, nums1: List[int], nums2: List[int]) -> List[int]:
        num_to_next_greater_mapping = collections.defaultdict(lambda: -1)
        mono_stack = []
        
        for index, val in enumerate(nums2):
            if mono_stack and val > mono_stack[-1]:
                while mono_stack and mono_stack[-1] < val:
                    num_to_next_greater_mapping[mono_stack[-1]] = val
                    mono_stack.pop(-1)
            mono_stack.append(val)
            
        results = []
        for n in nums1:
            results.append(num_to_next_greater_mapping[n])
            
        return results
            

Stay tuned for more of these problems in this space.

Posted in Better Programming, Java Programming, Software Engineering

Basics of Java Threads

What is a thread?

A Thread in Java is a unit of execution within a process. Every Java program has atleast one thread (the main() thread). If we do not create a thread explicitly, our program runs on the main thread.

A process can therefore contain multiple threads. For this reason, creating threads is a more lightweight action compared to the resources it takes for the creation of a process. Threads terminate quickly as well compared to processes.

Why to use Multithreading?

  • To execute two or more threads at the same time and take advantage of multicore architectures
  • To run async background tasks such as logging, IO tasks etc
  • Run isolated code in parallel to increase computation speed for CPU bound processes
  • To create watchers for configuration changes

How to create threads?

Let’s look at some common ways of creating Threads in Java. There are a couple of simple ways to create threads in Java, namely

  • Implement the java.lang.Runnable interface and override the run() method
  • Extend the java.lang.Thread class and override the run() method


Method 1: Extend the java.lang.Thread class and override the run() method

public class Main {
    System.out.println("Running in main thread.");
    Thread myThread = new MyThread();
    myThread.setName("--- MyThread ---");
    myThread.start(); // This runs the thread
}

public class MyThread extends Thread {
    @Override
    public void run() {
        System.out.println("Hello from " + currentThread().getName());

        try {
            Thread.sleep(2000); 
        } catch (InterruptedException e) {
            System.out.println("MyThread was interrupted.");
            return;
        }
    }       
}
Running in main thread.
Hello from --- MyThread ---

Method 2: Implement the java.lang.Runnable interface and override the run() method

In this method, we create an instance of the class implementing the Runnable interface and pass it to the Thread() constructor.

public class Main {

    public static void main(String[] args) {
        System.out.println("Running in main thread.");
        Thread myRunnableThread = new Thread(new MyRunnable());
        myRunnableThread.start();
    }
}

public class MyRunnable implements Runnable {

    @Override
    public void run() {
        System.out.println("Hello from MyRunnable's run() method");
    }
}
Running in main thread.
Hello from MyRunnable's run() method

Method 3: Anonymous class overriding the run() method

public class Main {

    public static void main(String[] args) {
        System.out.println("Running in main thread.");

        new Thread() {
            @Override
            public void run() {
                System.out.println("Hello from the anonymous class run() method.");
            }
        }.start();
    }
}
Running in main thread.
Hello from the anonymous class run() method.

Method 4: Anonymous implementation of Runnable interface

public class Main {

    public static void main(String[] args) {
        System.out.println("Running in main thread.");

        new Thread(new Runnable() {
            @Override
            public void run() {
                System.out.println("Hello from the anonymous Runnable implementation of run() method");
            }
        }).start();
    }
}
Running in main thread.
Hello from the anonymous Runnable implementation of run() method

Gotchas

  • Every thread created in a process shares the process memory and files which can lead to concurrency problems if not handled correctly. Each Thread has its own Thread stack that only that particular thread can access.
  • A thread does not have to complete before another one starts unless we use something such as join() or interrupt() in Java or other ways to make a thread wait until another one completes execution. JVM decides when to schedule different threads to run.

Hope you learnt about the basics of Threads and some simplest ways of creating threads.

In the four methods that we saw above, threads should be instantiated and managed by developers manually. Oracle came up with a way of abstracting thread management using Executor API with its focus mainly on asynchronous processing rather than Thread management. This is a topic on its own, so let’s explore that in more detail in the next article along with synchronization of threads etc.

Posted in Better Programming, Java Programming, Software Engineering

6 Confusing Java Concepts Simplified!

Java, Software, Software Development

In this post, we will be learning about the following concepts.

  1. Instance Vs Static Methods
  2. Interfaces Vs Abstract Classes
  3. Inner Vs Anonymous Classes

1. Instance Vs Static Methods

What are static methods?

These methods are declared using the static modifier. They are mainly used when we don’t require any data access through the instance of a class. For the same reason, static methods do not have access to this keyword referring to the current instance of a class.

Syntax of Static methods

class MyClass {
    public static void staticMethodName() {
        System.out.println("This is a static method");
    }
}

// Accessing a static method
MyClass.staticMethodName();

When to use static methods?

  • Declare a method as static when it doesn’t use any class instance variables.
  • When every instance of a class should share the same copy of variables and methods, declare them as static.

What are instance methods?

Instance methods are those that are accessible through an instance of a class created using the new keyword. These methods can access the current instance of the class using this keyword.

Syntax of Instance methods

class MyClass {
    public void methodName() {
        System.out.println("This is an instance method");
    }
}

// Accessing an instance method requires an object to be created
MyClass object = new MyClass();
object.methodName();

When to use instance methods?

  • If the method uses or modifies instance variables, then declare them as instance methods.
  • When each instance of a class should have its own copy of variables, use instance variables and methods.

2. Interfaces Vs Abstract Classes

What are interfaces?

Interfaces contain declaration of methods of a class but not their implementation, but they can contain default and static methods from Java 8. Therefore, they define the type of operations that an object can perform but the details of those operations are to be defined by classes that implement an interface. They can also be Extended by other interfaces.

Interfaces cannot be instantiated because they represent a contract that the class that implements an interface will be able to perform all the operations declared in it. You can also think of it this way, if the methods contain no implementations at all to use or modify class variables, would there be any use to instantiating an interface?

Syntax of interfaces

public interface MyInterface {
    
    // Fields should be constant and are static and final
    final int number = 1;
    
    // Notice that the methods are abstract by default
    public void method1();
    public void method2();
    public void method3(int number);
}

An interface can be implemented using the implements keyword

class MyClass implements MyInterface {
    @Override
    public void method1() {
        System.out.println("Implementation of method 1");
    }

    @Override
    public void method2() {
        System.out.println("Implementation of method 2");
    }

    @Override
    public void method3(int number) {
        System.out.println("Implementation of method 3");
    }
}

An interface cannot be instantiated, but it is possible to declare a variable of an interface type and assign a class instance to it implementing that interface.

public class Main {
    public static void main(String[] args) {

        // A class instance declared using interface type
        MyInterface myClassInstance;
        myClassInstance = new MyClass();
    }
}

// This is not valid
MyInterface sampleInterface = new MyInterface();

When to use interfaces?

  • When completely unrelated classes should be able to implement the interface. Example: Comparable and Cloneable.
  • To specify the overall behavior without worrying about who implements them or how.

An excellent example of an interface is the Java collections API. Notice how various classes such as ArrayList, LinkedList and Stack all have the same APIs such as add(), isEmpty(), remove(), size() etc with different implementation details.

What are abstract classes?

Abstract classes cannot be instantiated into an object as well. They can contain methods with and without implementation details.

An abstract class can extend from only one parent class although it can implement multiple interfaces. The issue of being able to extend from only one class is not only limited to abstract classes. You can read more about the diamond problem here.

Syntax of abstract classes

public abstract class myAbstractClass {

    private String myVariable;
 
    public myConstructor(String myVariable) {
        this.myVariable = myVariable;
    }

    // Note how abstract classes can contain regular and abstract methods
    public abstract void myAbstractMethod1();
    public abstract void myAbstractMethod2();

    public String getMyVariable() {
        return myVariable;
    }
}

// Abstract classes can be extended this way
public class myExtendedClass extends myAbstractClass {

    public myExtendedClass(String myVariable) {
        super(myVariable);
    }

    @Override
    public void myAbstractMethod1() {
        System.out.println("Implementation of myAbstractMethod1");
    }

    @Override
    public void myAbstractMethod2() {
        System.out.println("Implementation of myAbstractMethod2");
    }

    public void printMyVariable() {
       System.out.println("My variable is " + getMyVariable());
    }

}

When to use abstract classes?

  • If a class contains abstract methods ie., methods without implementation details, then the class should be declared as abstract.
  • To share code with related classes.
  • To do things interfaces (Java < 9) don’t do – to enable classes to extend abstract classes and define fields or methods with access modifiers such as private, protected and to declare non-static and non-final fields.

To summarize, use abstract classes when you need a base class with certain definitions that different derived classes can share.

Java has several examples of abstract classes such as InputStream, OutputStream Reader etc. Note how they all extend only from one class but implement multiple interfaces.

3. Inner Vs Anonymous Classes

What are inner classes?

Inner classes are those that are declared inside another class or interface without a static modifier aka non-static nested classes. There are three main types.

  • Member inner class – lives inside a class
  • Anonymous inner class – to create an instance of an object with some extra functionality, to overload existing methods of a class or interface
  • Local inner class – lives inside a method

In most cases, they are declared as private so that they aren’t exposed to other classes.

The inner class can access all the member variables and methods of the outer class include private ones.

Syntax of inner classes

// This example shows a member inner class
class MyOuterClass {
    class MyInnerClass {
    }
}

// Example code to create an object of inner class
MyOuterClass outerObject = new MyOuterClass();
MyOuterClass.MyInnerClass innerObject = outerObject.new MyInnerClass();


// This example shows an anonymous inner class
// This is similar to a constructor invocation with class definition inside a block
MyClass object = new MyClass() {
                     @Override
                     public void method() {
                         System.out.println("This is an anonymous inner class with a method overriding the method of MyClass that implemented from another interface");
                     }
                 };

// To call the method
object.method();

When to use inner classes?

  • If a class is only useful inside the scope of another class and is coupled to it, then create an inner class ie., without an existing outer class object, there is no chance of existing inner class object.
  • Create an anonymous inner class to provide an additional functionality to an object.
  • To program a class that no other class can access except an outer class.
  • Declare an inner class as private if no other classes should be able to create an object of that inner class except the outer class.

What are anonymous classes?

We already learnt about anonymous classes in the previous section, but let’s get into a little more detail here. Anonymous classes are inner classes in Java that do not have a name and are declared and instantiated in the same statement.

Since they do not have a name, we can’t create instances of anonymous classes or define a constructor inside the class body.

They extend the top level class and implement an interface or extend an abstract class.

Syntax of anonymous classes

Runnable action = new Runnable() { // Runnable is a Java interface
    @Override
    public void run() {
        System.out.println("This is an anonymous class method");
    }
}; // Semicolon is important since anonymous classes are expressions

When to use anonymous classes?

  • To use a local class only once.
  • To quickly override a small amount of functionality instead of the overhead of creating a separate class.
  • To use variables or constants declared in the code right away in an anonymous class instead of passing it through the constructor of a class.
  • To avoid having to override all the unimplemented methods of an interface or abstract class.
  • Do not use them to override a lot of functionality since this can make the code unreadable.

Hope this article clarified some of the confusing concepts in Java to enable you to use them in the right places. Please feel free to give feedback if any part of article can be improved. Happy coding!

References:

Posted in Better Programming, Software Engineering

Learn the basics of Web Caching

Caching is a mechanism by which responses from the web server such as pages, images etc are stored so that when a client requests the resource again, the response is served from the cache instead of sending a request to the web server.

Why is it important to use caching?

  • Reduce the number of requests sent to the server
  • Reduce the latency of responses for the client by serving content from nearby cache instead of a remote server
  • Reduce network bandwidth by minimizing the number of times a resource is sent over the network from the web server

There are two main types of web caches. Let’s take a look at them.

Browser Cache

Browser Cache

If you are a Mac and Chrome user, you can find the the contents of the browser cache in the following path.

/Library/Caches/Google/Chrome/

The browser cache stores parts of pages, files, images etc to help them open faster during a user’s next visit. When a user clicks the back or next button in the browser, the contents are served from the cache directly. The contents of the cache are refreshed regularly after a certain amount of time or during every browser session.

How is the browser cache controlled?

There are several caching headers to define cache policy. Let’s look at the Cache-Control header in the following example which is set to private. This means that a private browser cache can store the response.

Source: redbot.com

There are different caching directives that can be used to set this header.

Caching HeadersDescription
Cache-Control: no-storeNothing should be cached about the request or response
Cache-Control: no-cacheThe cache sends a validation request to the server before serving from cache
Cache-Control: privateThe response is only applicable to a single user and must not be stored by a shared cache
Cache-Control: publicThe response can be stored by any cache
ExpiresThis header contains the date/time after which the response is considered stale. Ex: Expires: Wed, 22 Sept 2021 12:00:00 GMT
EtagThe entity-tag given in an ETag header field is used for Cache validation. One or more entity-tags, indicating one
or more stored responses, can be used in an If-None-Match header by the client for response validation.
Last-ModifiedThe timestamp given in a Last-Modified header can be used by the client in an If-Modified-Since header field for response validation
Caching Headers

For further reading, please refer to this detailed article on HTTP Caching.

Proxy Cache

Proxy Cache

Most web services these days use a proxy server as a gateway to handle requests before hitting the web servers. When a server acts as a caching proxy, it stores content and shares those resources with more users. Therefore this type of cache is also known as a shared cache. When a user sends a request, the proxy sever checks for a recent copy of the resource. If it exists, it is then sent back to the user, otherwise the proxy sends a request to the source server and caches the resulting content.

CDNs (Content Delivery Networks) are one of the most popular proxy servers. CDNs are a large network of servers geographically distributed around the world to serve content from a server closest to the user sending a request. When CDNs are configured properly, these can also help a web service prevent DDOS (Distributed Denial of Service) attacks as well.

What is cached?

HTTP caches usually cache responses to a GET request. This can be HTMP documents, images, style sheets or files such as media, javascript files etc. Secure and authenticated requests such as HTTPs will not be cached by shared caches. It is also possible to cache permanent redirects and error responses such as 404 (Not Found).

  • If the cached content is fresh (not expired or is in accordance with the max-age caching header, then it is served directly from the cache. There are other ways to determine freshness and perform cache validation, but we won’t go into the details here. I encourage you to read up on them if you’re interested.
  • If the content is stale, the must-revalidate Cache-Control directive is used to tell the cache to verify the freshness of the content.

The primary key used to cache contains the request method (GET) and the target URI (Uniform Resource Identifier). HTTP Caches are limited mostly to GET, so caches mostly ignore other methods and use the URI as the primary caching key.

Caching Best Practices

  • Consistent URLs – Use the same URL for serving same content on different pages and sites to users.
  • Library of content – Use a single source of truth library to store images and other shared content such as style sheets etc and refer to the same library from any page or site.
  • Avoid bulk modifications – The Last-Modified date will be set to a very recent once when you update too many files at the same time, so be aware of changing only the necessary ones.
  • Cache control – Use the appropriate cache control policies. If the response is private to the user, allow private caching and for generic content, set caching policy to public.
  • Use caching validators – Use the validation headers we learnt about in the table above such as Etag and Last-Modified so that caches can validate their content without having to download the resources from the server unnecessarily.
  • Max-age cache control – Set cache control to max-age for pages and images that will be updated only rarely.

I hope you enjoyed learning about the basics of web caching! In the next article, we will learn how to implement a simple cache from scratch.

Posted in Better Programming, Software Engineering

Fundamentals of HTTP Requests, Cookies and Sessions

What is HTTP?

Client Server Architecture

Hypertext Transfer Protocol is an application layer (layer 7 in the OSI model) protocol to transfer hypermedia (graphics, audio, plain text and hyperlinks etc) over the network. There are several iterations of the HTTP protocol namely

  • HTTP/1
  • HTTP/2
  • HTTP/3

Majority of the websites are using HTTP/1.1 and HTTP/2.

HTTP is a request-response based protocol for the purpose of communication in a Client-Server based architecture. HTTP commonly uses TCP (Transmission Control Protocol) underneath as its transport layer protocol to enable reliable communication.

How is HTTP stateless?

A stateless protocol is one in which the receiver does not retain any state or session information from previous requests. This means that each HTTP request is processed in isolation. IP (Internet Protocol) is another example of a stateless protocol.

On the other hand, TCP on top of which HTTP is built is a stateful protocol. This is because the client and server agree on

  • how much data will be transferred
  • order of the packets to be reassembled at either ends

which makes TCP a very reliable transport layer protocol. Within the scope of an HTTP request, the TCP connection is stateful thus ensuring reliable transfer of data. However once that request is processed and a response is sent back, no information about the request is retained. To store state information, various session management techniques are used by web servers.

What are Sessions?

Session Management is used to implement state on top of the stateless HTTP. For example: if a user logged in to a website and is authenticated, the server should not repeatedly ask for the user’s credentials with every subsequent interaction. This is accomplished by using HTTP cookies or session IDs.

HTTP Cookies

Cookies enable web browsers to store stateful information about a user session. These are chunks of data about a user’s session that is sent by the web server to a client device. More than one cookie can be stored by the browser in the user’s device.

Although authorization cookies are essential, this other type called tracking cookies have come under much scrutiny due to privacy concerns. Tracking cookies especially third-party tracking cookies are used to track your browsing history enabling behavioral advertising. Therefore European law requires that all websites targeting European Union member states gain “informed consent” from users before storing non-essential cookies on their device. So go ahead and click no when websites prompt you to accept third party cookies. Here’s a detailed article on third party cookies if you are interested.

Session ID

Session IDs or tokens are typically used in HTTP based connections to identify a user session. For example: when you are adding items to the Amazon shopping cart, the server should have a way of retaining items added to the cart even though you browse through various pages. In this case session ID or token is a way of keeping track of the user’s shopping cart.

Components of an HTTP Request

An HTTP request contains the following

  • Request Line
  • Request Headers
  • Body

Let’s look at an example GET request.

HTTP Request Line

The request line contains the name of the HTTP method to be used. We will look at all the HTTP methods in detail in another post. In the example below, GET is the HTTP method. Following the method is the URI (Unified Resource Identifier) which is the address used to locate a resource. The final part refers to the version of the HTTP protocol.

GET thatgirlcoder.com/ HTTP/1.1

Here’s a detailed example from inspecting the GET request from Google chrome.

Request URL: https://thatgirlcoder.com/
Request Method: GET
Status Code: 200 
Remote Address: 100.0.00.00:111
Referrer Policy: strict-origin-when-cross-origin

HTTP headers

Headers contain metadata to provide more information about a request. In the following example Accept and Host are headers

:authority: thatgirlcoder.com
:method: GET
:path: /
:scheme: https
accept: text/html,application/xhtml+xml,application/xml;
accept-encoding: gzip, deflate, br
accept-language: en-US,en;q=0.9
user-agent: Mozilla/5.0 (<system-information>) <platform> (<platform-details>) <extensions>

Request Body

A request body is used alongside HTTP methods which are used to change the state of the server such as PUT, POST etc. GET requests do not have a request body section.

Components of an HTTP Response

An HTTP response contains the following

  • Status Line
  • Response Header
  • Body

Status

An HTTP response contains a status code to indicate the successful completion of a request. For example:

HTTP/1.1 200 OK

Here’s a list of possible status codes and their descriptions.

Status CodesDescription
200 – 299Successful response
100 – 199Informational response
300 – 399Redirect response
400 – 499Errors on client side
500 – 599Errors on server side

Response Header

The server responds back with some HTTP headers as well. A popular one is the Set-Cookie header which the client and server use to authenticate a session.

Set-Cookie: key=fkhKFHlfhF; expires=Thur, 09-Sept-2023 12:00:00 GMT; Max-Age=4823982; Path=/; secure

Response Body

The body contains the content requested by the client. In the below example we requested an HTML document.

<!DOCTYPE html>
<html lang="en">
<head>
<meta charset="UTF-8">
<meta name="viewport" content="width=device-width, initial-scale=1">
<title>That Girl Coder – Learn and Grow Everyday!</title>

I hope you learnt some basics of HTTP requests today. Let’s keep diving deeper into this topic over the next few posts!

Posted in Better Programming, Python, Python Libraries

How to create a simple Python TCP/IP Server and Client?

Before we begin, let’s start with some basics.

Inter Process Communication (IPC)

IPC is a communication mechanism that an Operating System offers for processes to communicate with each other. There are various types of IPCs such as:

  • Pipes
  • Sockets
  • Files
  • Signals
  • Shared Memory
  • Message Queues/ Message Passing

Sockets

Sockets are used to send data over the network either to a different process on the same computer or to another computer on the network.

There are four types of sockets namely,

  • Stream Sockets
  • Datagram Sockets
  • Raw Sockets
  • Sequenced Packet Sockets

Stream sockets and datagram sockets are the two most popular choices.

Stream SocketsDatagram Sockets
Guaranteed deliveryNo delivery guarantees
Uses TCP (Transmission Control Protocol)Used UDP (User Datagram Protocol)
Needs an open connectionDon’t need to have an open connection

How are sockets used in Distributed Systems?

Distributed Systems are built using the concept of Client Service architectures.

  • Clients send requests to servers
  • Servers send back responses or error codes accordingly

The communication across servers and clients in a distributed system uses sockets as a popular form of IPC. Sockets are nothing but a combination of

  • IP Address. Ex: localhost
  • Port number. Ex: 80

Each machine (with an IP address) has several applications running on it. We need to know on which port an application is running in to send requests to it.

What is TCP/IP?

We will go into the details of communication protocols in a different article and stick to the basics for today. TCP stands for Transmission Control Protocol, a communications protocol for computers to exchange information over a network.

IP stands for Internet Protocol. IP identifies the IP address of the applications or devices to send data to and forms the Network Layer in the OSI stack. TCP defines how to transport the data over the network. Ensuring delivery guarantee is still TCP’s job.

When we send an HTTP request to a server, we first establish a TCP connection, so HTTP sits on top of TCP as the transport layer. When a user types a URL into the browser, the browser sets up a TCP socket using the IP address and port number and starts sending data to that socket. This request is sent as bytes in the form of data packets over the network. The server will then respond to the request. The benefits of a TCP connection is that a server sends acknowledgement of each packet based on which the client retransmits data in case some packets get dropped. Each packet has a sequence number that the server uses to assemble them upon receiving.

Now let’s look at an example Python program on how to write a simple script to setup a TCP/IP server and client.

Python TCP/IP server

import socket

# Set up a TCP/IP server
tcp_socket = socket.socket(socket.AF_INET, socket.SOCK_STREAM)

# Bind the socket to server address and port 81
server_address = ('localhost', 81)
tcp_socket.bind(server_address)

# Listen on port 81
tcp_socket.listen(1)

while True:
	print("Waiting for connection")
	connection, client = tcp_socket.accept()

	try:
		print("Connected to client IP: {}".format(client))
        
        # Receive and print data 32 bytes at a time, as long as the client is sending something
		while True:
			data = connection.recv(32)
			print("Received data: {}".format(data))

			if not data:
				break

	finally:
		connection.close()

Python TCP/IP Client

import socket

# Create a connection to the server application on port 81
tcp_socket = socket.create_connection(('localhost', 81))

try:
	data = str.encode(‘Hi. I am a TCP client sending data to the server’)
	tcp_socket.sendall(data)

finally:
	print("Closing socket")
	tcp_socket.close()

Terminal Output

Waiting for connection
Connected to client IP: ('127.0.0.1', 65483)
Received data: Hi. I am a TCP c
Received data: lient sending da
Received data: ta to the server
Received data:
Waiting for connection

Note:

To find and kill any applications running on a port.

List the processes running on port 81

sudo lsof -i:81

Get the PID number and kill the process

sudo kill -9 <PID>

Hope you enjoyed learning how to setup a simple TCP/IP server and client using Python.

Posted in Health, Professional Improvement

7 Small Habits for Software Engineers

1. Learn a technical concept everyday

This might look impossible when you are constantly juggling multiple things at work. But spend 10 to 20 minutes everyday learning or reading about a new technical concept. To avoid the fatigue of trying to find a topic everyday, you can make a list of 20 to 30 topics beforehand and then go through each item over the course of time.

2. Stand up during meetings

Ideally as a Software Engineer your day should not be filled with meetings. So whenever you get into a meeting, try to take it while standing. If you don’t have your video turned on, feel free to stretch and move around a little during the meeting. Standing desks or standing desk converters that you can place on top of your current ones are a great investment especially at a job that’s done from a desk for 7+ hours everyday.

3. Keep emailing and Slacking at bay

Many Engineers use their precious morning energy and mental clarity to check emails – an activity that mostly does not involve any thinking or creative problem solving except for maybe a couple of important emails everyday. So avoid opening your email first thing in the morning or keeping that tab open all the time. Instead check emails twice a day – maybe before lunch and once before signing off for the day.

Similarly avoid checking Slack/ Team or other messenger notifications all day reactively. You can go one step ahead and keep notifications muted and people can override it in case they really have to get their message across to you. Personally I have kept mine muted for a while now and urgent messages have been pretty rare.

4. Ask at least one question

Being able to ask relevant follow up questions can indicate how much of the content you did grasp from someone’s presentation. Try to think of at least one relevant question to ask during any technical presentation that you attend – be it within or outside the team. When you are listening to a presentation, try to be fully present. Don’t chat or check emails at the same time since our mind has to constantly context switch between different activities.

5. Keep mobile devices far away from your work station

A lot of Engineers keep their phones right by their keyboards and keep checking it every gap they get. We can even lose track of time sometimes in checking phones instead of giving ourselves uninterrupted chunks of time to focus on work. Making sure to focus on one thing at a time can help avoid fatigue and get things done faster. This way you have all the time you need at the end of the day to spend on your phones (although you probably shouldn’t :p)

6. Hydrate and rest your eyes

Software Engineers are required to stare into screens all day which can really cause a lot of damage and fatigue to our eyes. Use a chrome extension that reminds you to take a break from the screen every 20 – 30 mins. During this time you might as well go get some water and walk around!

There are also Pomodoro chrome extensions that nudge you to take a break after completion of focus time intervals.

7. Teach or document what you know

Aim to add slight improvements to existing documentation at least every week or once in two weeks. This will help your team keep documentation up to date.

If you have been working on something for 3+ months, try to teach about it to someone or give a presentation on that topic to your team or even outside your team. There’s nothing that solidifies your knowledge more than trying to teach it to someone.

Hope these tips help you build a better work life as a Software Engineer!

Posted in Better Programming

6 Simple Ways to Refactor Code

Before deciding to refactor code, we will first need to understand why it needs refactoring and whether it is worth the time investment. Some of the common indicators that the code needs refactoring are:

  • The code is hard to understand
  • There’s redundant code
  • Methods are long and complicated
  • Methods are hard to test
  • Tests have a bunch of repeated setup code
  • Classes are missing functionality
  • Crucial parts of the codebase are missing tests

Now let’s look at a few simple ways to refactor code.

Fix incorrect or inconsistent naming

Variables, Methods or Classes with ambiguous names are sometimes the best low hanging fruits yet useful ones to refactor. If there is inconsistency in the naming format such as snake_case vs camelCase, make sure to use the same format throughout the code. Try and follow the convention for that specific programming language. For ex: snake_case is more popular in Python but Java code goes with camelCase. Move constants to a separate file and use all CAPS in their variable names.

// Existing Code
first_name = Person.getFirstName();
last_name = Person.getLastName();

//Refactored Code
firstName = Person.getFirstName();
lastName = Person.getLastName();

Make it modular

If you find functions that are super long and hard to understand, capture chunks of code into separate functions and give them a relevant name. Each function should focus on a specific objective. If it is starting to have more than one purpose, the other ones should be delegated to new functions. It gets tricky when you have to decide between creating an instance method vs a standalone function.

  • If a set of methods define or modify the object instantiated by a Class, then include the function as an instance method of a Class.
  • If the function cannot belong in any Class or is generic enough to be used in multiple places, then create a standalone function.
# Existing code
def extract_user_info(info_object):
    first_name = info_object["name"]["first_name"]
    last_name = info_object["name"]["last_name"]
    
    user_address = info_object["address"]["line_1"] + info_object["address"]["line_2"]

    user_age = info_object["age"]

    # Do more things with the above info
   
# Refactored Code
class UserInfo:
    def __init__(self, user_info):
        self.user_info = user_info

    def get_user_name(self):
        return " ".join(self.user_info["name"]["first_name"], self.user_info["name"]["last_name"])

    def get_user_address(self):
        return ",".join(self.user_info["address"]["line_1"], self.user_info["address"]["line_2"])

    def get_user_age(self):
        return self.user_info["age"]

    def extract_user_info(self):
        user_name = self.get_user_name()
        user_address = self.get_user_address()
        user_age = self.get_user_age()

        # Do something more with all this info


Remove duplicate code

Code duplication can creep up in many ways.

  • When a list of setup steps have to be copied over multiple times
  • When you are trying to change just one thing about a Class, but this involves changing/ adding new methods to handle this change
  • When you find yourself copy pasting the same few lines over and over again

Let’s first learn about the Single Responsibility Principle. It states that every module, class or function in a computer program should have responsibility over a single part of that program’s functionality, and it should encapsulate that part. Source: Wikipedia

  • If you find that a class is doing too many things, capture the non-core functionalities into a separate class.
  • If a class needs to have all the properties of another class but with additional/ changed functionality of certain instance methods or variables, then try to add inheritance to the classes.
  • If too many classes have similar/ duplicate functionality, then create a super class.
  • If multiple files or modules are using the same set of code lines to accomplish something, for example: setting up a database connection etc. then create a separate function for this setup and use it in all the places.

Expand incomplete classes

Classes are incomplete when they don’t provide the user with the right functions to access the method variables.

A getter method returns the value of an instance variable while a setter method sets or updates the value. These methods make it safer to access or mutate an instance variable and should be made available as instance methods of a class. Overriding the toString() method in the class that gives the textual representation of an object at any moment can be a useful addition for clients to debug the objects containing user specified values.

class User {
    private String userName;
    private int age;
    private String address;

    User(String name, int age, String address) {
        this.userName = name;
        this.age = age;
        this.address = address;
    }
    
    // Example setter method
    public void setName(String name) {
        this.userName = name;
    }
    
    // Example getter method
    public void getName() {
        return this.userName;
    }

   // Override toString method
   public String toString() {
        return this.userName + "is" + this.age + " years old and lives at: " + this.address;

Introduce type checking

This part refers to languages that use dynamic typing. Compile time type checking is super useful although Python programmers may have been very used to dynamic typing. Missing type declarations can make it quite difficult to understand the type of various parameters in the code especially when we are dealing with complex types such as maps, objects etc. This can also introduce bugs into the code if parts of it are not meticulously explained with comments so that developers don’t mishandle objects. For example: you can look into tools such as mypy to add typing to a Python code base.

def extract_user_info(user_info_map: dict[str, str]) -> str:

Add unit tests

Refactoring any code can introduce bugs if there isn’t a proper test coverage. Make sure that parts of the code that you plan on refactoring has unit tests to begin with. Then write new tests or extend the existing tests before changing the code so that you can develop iteratively using Test Driven Development.

You can go one step further and look into coverage tools that give a detailed summary of lines of code that have not been tested.

Now get refactoring!!