Postman is a popular platform that is used for API development and testing. The easy-to-use and simple interface helps make the API development process faster and more efficient.
Users of Postman can send HTTP requests and get responses which makes the API building, testing and debugging process simple.
Features of Postman
The Postman API enables users to access any data that is stored in the Postman account easily.
Postman offers a set of tools to help design, test, document APIs and also share and collaborate on the API development process.
Postman has different types of workspaces for personal use, teams to collaborate as well as public workspaces. These help in organizing the APIs effectively.
The Governance feature in Postman API gives the API design rules, industry best practices and good development practices to help teams design the best APIs for use.
Installing Postman
Postman can be downloaded and installed on your laptop for use. See here for more details. You can also use Postman on the web. There is a CLI tool and Newman which can run collections from command line.
Postman Interface – Sending an HTTP Request
Remember the simple User REST API app that we created in a previous blog post? If you haven’t read Your Ultimate Guide to Understanding REST APIs yet, I highly recommend that you do. Now let us see how we do the GET request from Postman.
curl GET http://localhost:8080/users
You can create a new request by clicking the + sign above the request tab.
The drop down menu in the interface has a list of HTTP methods such as GET, POST, PUT etc. The box next to it is where we enter the URL path of our request.
3. You can add parameters, headers, authorization etc for your API below the request bar.
4. Once you click the “Send” button, the request should be sent.
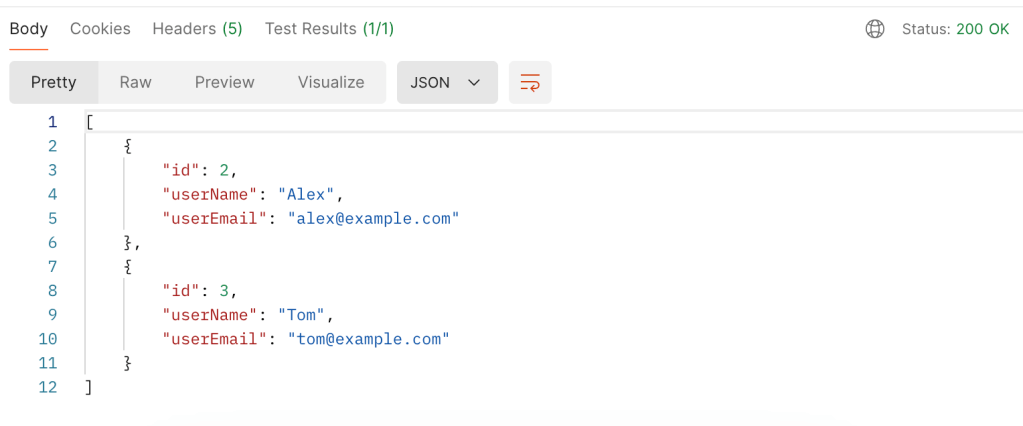
5. At the bottom you will find the response window with the results, status code, time taken for the request etc.
Postman Collections
You will notice an icon called Collections on the left side. This is where you can organize your APIs based on use cases. Each collection is a set of endpoints and API calls for a particular application.
Collections can be easily saved, shared and collaborated on by importing or exporting the collections.
Authorization in Postman
Postman has a lot of different types of Authorization that can be enabled including OAuth 2.0 which is the most popular type.
To use OAuth 2.0, enter the request details in the request tab with the necessary parameters, body etc.
Click the Authorization Tab.
Select OAuth 2.0 fro the drop down menu.
Configure the Settings with the token name, type and other credentials.
Click “Request Token” once all the fields are filled out.
Once you have the token, Postman will add it to the Authorization header automatically and you can now send your requests to the API.
Postman Environment Variables
Environment Variables in Postman enable you to save values that are used frequently in variables to load them dynamically during request execution. You can use them across different environments such as prod, dev etc.
Click the Environment Tab in your workspace to create a new environment.
Name your environment – prod, dev etc.
Add keys and values for the environment variables. The OAuth token mentioned in the previous section can be stored as an environment variable.
Save the environment.
You can also save global variables in the Globals section.
To use these variables in the request, use double curly braces {{ }}. For example
Authorization Header
Bearer {{authToken}}
URL
{{baseUrl}}/users
Hope this quick guide helps you get started with Postman. There are a lot more powerful features in Postman. I have linked some additional resources below for further reading.
REST stands for Representational State Transfer which simply is a set of rules for software to interact with each other over the network. There are many other protocols for software to communicate with each other such as SOAP (Simple Object Access Protocol), GraphQL (An API query language), gRPC (gRPC Remote Procedure Call) etc. REST is one among them. REST is widely popular due to being simple, interoperable, lightweight and scalable. It is suited well for web services and applications with CRUD operations.
Key Features of REST APIs
Understanding Resources and URIs are key to understanding REST APIs. Resources are data objects that can be accessed via REST APIs. They are identified with a Uniform Resource Identifier (URI). HTTP methods such as GET, POST, PUT and DELETE are used to perform operations on the resources. The resources are represented in formats such as JSON, XML etc.
REST APIs have the following key features.
Client Server Architecture
REST operates on a Client-Server model where a client sends a request to the server and the server sends back an appropriate response. This is done using the URIs mentioned above. This type of model also allows for the client and server to be modified independently offering a separation of concerns.
Statelessness
REST is stateless meaning the client should have the all the information that the server needs to process a request, contained within the request. The server won’t store any client state. Each request is handled independently by the server.
Layered Architecture
REST has a layered architecture where each layer is independent and interacts with the layers interfacing with it. This enables scalability and security in the system. For example, layers such as load balancing, security etc can be added to the system and the client will not know which layers it is talking to.
REST API Methods
REST APIs use standard HTTP methods making them simpler to use.
GET – To retrieve data
HEAD – Transfer only the status line and header section
POST – To create a new resource
PUT – Update an existing resource
DELETE – Delete a resource
PATCH – Modify an existing resource partially
We will go over examples for some of these in the section below.
Build a REST API using Java Spring Boot
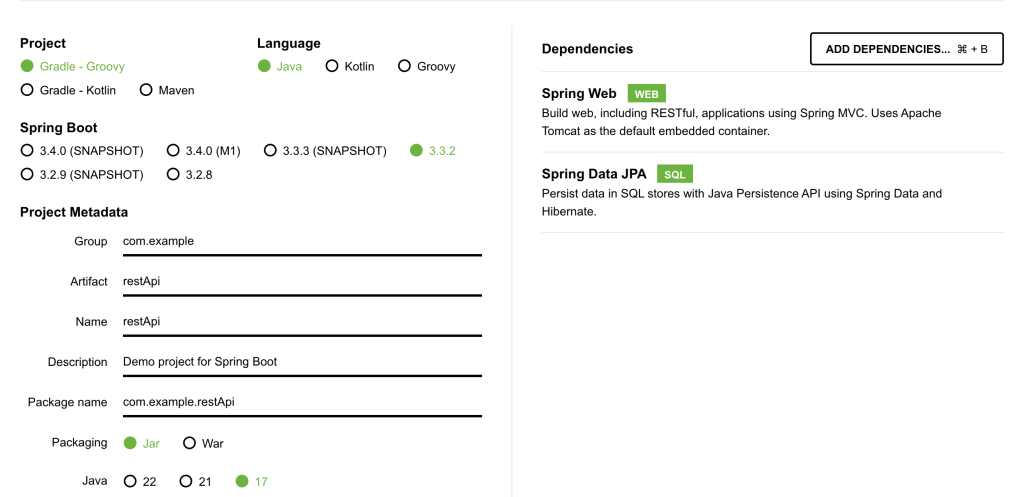
Let us build a simple User REST API using Java Spring Boot. Go to https://start.spring.io/ and generate a new project called restApi with the dependencies – Spring Data JPA (For database operations) and Spring Web (for REST APIs).
You can find the full working code on my Github link here.
Next, we will create a simple UserREST API. There are 5 main components to the REST API.
User class – This defines the structure of a User Entity.
User Repository – handles data operations.
User Service – contains basic methods to manipulate User objects.
User REST API – Contains the GET, POST etc methods to perform http operations.
application.properties – To define the database connection for the REST API.
Design a User Entity
User has three defining class variables – user id, user name and user email. We will also add getters and setters for these variables.
@Entity
public class User {
    @Id
    @GeneratedValue(strategy = GenerationType.IDENTITY)
    private Long id;
    private String userName;
    private String userEmail;

    public Long getId() {
        return id;
    }

    public void setId(Long id) {
        this.id = id;
    }

    public String getUserName() {
        return userName;
    }

    public void setUserName(String userName) {
        this.userName = userName;
    }

    public String getUserEmail() {
        return userEmail;
    }

    public void setUserEmail(String userEmail) {
        this.userEmail = userEmail;
    }
}
Define a User Repository
The repository will handle data operations. JpaRepository is a JPA (Java Persistence API) extension of Repository with API for basic CRUD operations and also API for pagination and sorting.
@Repository
public interface UserRepository extends JpaRepository<User, Long> {
}
Define a User Service
This service interacts with the User Repository and will be called by the REST API to perform operations.
@Service
public class UserService {

    @Autowired
    private UserRepository userRepository;

    public List<User> getAllUsers() {
        return userRepository.findAll();
    }

    public User getUserById(Long id) {
        return userRepository.findById(id).orElse(null);
    }

    public User createUser(User user) {
        return userRepository.save(user);
    }

    public void deleteUser(Long id) {
        userRepository.deleteById(id);
    }
}
Define the User REST APIs
This is the final User REST API. We need to specify @RestController for Spring Application to recognize our REST API.
We will use @GetMapping and @PostMapping annotations to mark the functionality of different endpoints of the REST API.
@RestController
@RequestMapping("/users")
public class UserController {

    @Autowired
    private UserService userService;

    @GetMapping
    public List<User> getAllUsers() {
        return userService.getAllUsers();
    }

    @GetMapping("/{id}")
    public User getUserById(@PathVariable Long id) {
        return userService.getUserById(id);
    }

    @PostMapping
    public User createUser(@RequestBody User user) {
        return userService.createUser(user);
    }

    @DeleteMapping("/{id}")
    public void deleteUser(@PathVariable Long id) {
        userService.deleteUser(id);
    }
}
Add a properties file for the Database connection
For the connection to work, you need to install MySQL connector and MySQL workbench, set up username and password and create a database called restApi. The MySQL server should be running when you run the Spring Boot Application.
Now that we know how to build a simple REST API, let’s look at some best practices to keep in mind when designing REST APIs.
REST API Best Practices
Here are some best practices to adhere to when designing REST APIs.
Use the right HTTP methods for different operations.
Use nouns for resource names such as id etc. and plural forms for collections such as users, items etc.
Be consistent with the naming conventions.
Use the right HTTP Status codes.
Handle errors on the server side and offer meaningful debug information.
Add rate limiting for your application.
Implement the right authentication to prevent unauthorized access to the application or data.
Document your REST APIs for easy usage.
When to Use REST Vs Other Protocols?
There are various other protocols out there such as SOAP, gRPC, GraphQL, WebsSockets etc.
REST works well in most cases for general purpose APIs, they are simple to implement and interface with and are compatible with most web technologies.
Other protocols such as SOAP are used in more enterprise environments, gRPC is better in use cases which need high performance and low latencies, GraphQL allows more flexibility with fetching data, Web Sockets work well for real time communication APIs.
REST API Observability and Monitoring
It is important to ensure that we log meaningful information and track metrics of our system for observability and performance monitoring.
Define the key metrics for your application and track metrics such as Latency, Throughput, Error rates, CPU usage, memory usage etc. There are many tools these days such as Prometheus for metrics collection and Grafana for visualizing metrics data.
Tracking logs such as Error Logs, Access Logs is also important when designing and maintaining APIs.
Once the metrics and logs are tracked, you can set up alerting on these to take action based on various scenarios.
Summary
I hope you enjoyed reading this ultimate guide to REST APIs where we started from the basics of REST APIs, went on build a simple REST API from scratch using Java SpringBoot and went over REST API design best practices as well Observability and Monitoring to-dos for a system.
If you want to read more such articles, subscribe to my blog below.